The Paleto Score & Set Up
● GOLD MEDAL ●
Various
Objectives
See
Below
|
Michael, Franklin, and Trevor rob a bank in the sticks to raise funds for their next FIB adventure into American freedoms.
Rewards: Lots and lots of money
Protagonists: Michael, Trevor, Franklin
Paleto Score Setup
Trevor takes a piss in the corner of his meth lab as Michael walks in. Michael shares his opinion of Trevor's place of business and both get into a heated argument over their personalities. Steven Haines and Dave Norton enter the room to break up the fight. They are enlisting their puppets for more government fun. A research lab needs to be investigated for ties to biological terrorism. The crew will need a boat, tandem lift helicopter, weapons, and a truck. The crew will need to source the equipment themselves. At a breaking point, Michael rants angrily about how he was retired next a pool a few weeks ago until Trevor arrived to torture him about past mistakes. Michael has little left at this point and definitely has no money to finance this FIB job. Trevor applauds the return of the Michael he knew and the agents head out. Michael calms down and says he will give Lester a call. Trevor says they are heading out towards Paleto Bay.
In control of Michael, get in the
car out front with Trevor and drive to
Paleto Bay. Michael calls Lester about the
bank in the sticks job he had mentioned prior to
the jewel heist. Lester agrees to take a bus out to Paleto Bay to meet him. Michael and Trevor discuss money transactions in Blaine County - something Trevor is very familiar with. Trevor says the police extort money from drug farms and whorehouses then stash it in safe deposit boxes at the bank. Then there are the regular customers on top of that. The conversation then shifts over to Trevor's lifestyle and Michael points out that Trevor is, in fact, a hipster. That doesn't go over too well. After pulling into the marker they now need to wait for Lester.
Sizing up the job
Some time goes by and we find Trevor throwing pebbles at Michael. The bus pulls up to the stop and Lester gets off to a small welcome. The three get in the car. Drive to the
bank. Lester wants to take a look at the front. He says the alarm should be outdated providing plenty of escape time. When you pull up look at the front. Not much to see so Lester wants to see the back. Drive around to the
lot next door. Michael likes the location but the newer alarm system they find around back has Lester worried. Trevor doesn't want to find another place so Lester decides to trigger the alarm and clock the response time.
Michael gets out of the car and you are told to shoot the
alarm. Do so and get back in the
car. Drive around to the
gas station across from the bank as Lester monitors the police scanner. The radio traffic sends four units in no time with others on standby. More than expected and not looking good for their escape. Trevor brings up his point about the cop's dirty money stored in there. The cops on scene confirm a false alarm but set off intentionally. They want checkpoints set up on the highway.
Trevor gets out since he doesn't want Lester slowing him down. He steals a motorcycle next to the car. Michael says he and Lester are still faster. SWITCH to Trevor if you want. Whichever you choose, drive back to
Trevor's office. Michael and Lester discuss some points of this score and why Michael and Trevor need to do it in the first place. Lester says the officers out here aren't as well trained as the LSPD for well armed suspects coming straight for them so there's a bit of hope. When you arrive comments will be made by both winner and loser.
Decisions, decisions
Upstairs Lester sets up his planning board while Trevor heats up leftovers for Michael who doesn't find anything in Trevor's fridge appetizing. More for Trevor. Lester calls Michael over when he is ready. Response times are too quick for them to escape so they'll need to take on the cops. Military shipments with necessary equipment pass near Trevor's meth lab regularly. Lester will give details later. An upside to the location is that the bank is near the water. Franklin will be waiting with a boat for their escape. There is no choice in approach to this heist. You can only choose a gunman. The choices are:
- Gunman: Gustovo Mota (14%), Norm Richards (7%), Daryl Johns (6%), Chef (12%), *** Packie McReary (12%) If saved during random event
Decide and Lester says he will get the equipment together. Michael will call Franklin and Trevor will do what he does. Trevor offers his house to Lester but he'll find a motel room instead. Michael takes Lester home leaving Trevor to vomit what he just ate. Not long after this mission Lester will send a message to Michael and Trevor informing them about the military convoys. A heist set up icon appears on your map. Trevor will also get a phone call from Franklin that the O'Neil brothers came looking for him in Los Santos. He's tailing them to see where they go. This opens up the mission
Predator which you need to complete before moving on to the Paleto Score.
Tips
- There isn't much to this mission. Get out to Paleto and drive Lester around as needed.
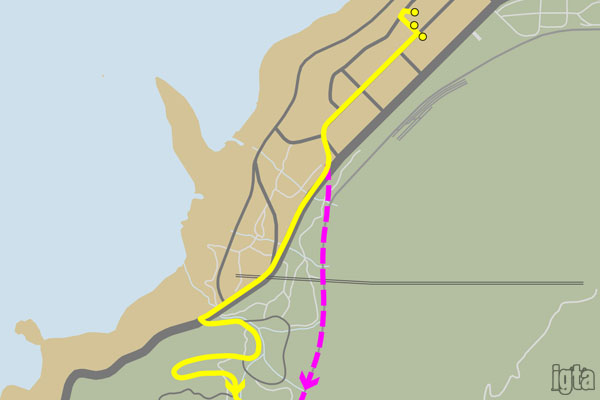
- The recommended path back to the office takes you up over the mountains. You do need to take this route or else you'll run into a police checkpoint and fail the mission going either way on the highway. You can't drive on the train tracks going east (police see you) but you can go west (purple route above) and they take you right over to the meth lab. Just watch out for trains. Whichever character you choose during the race is likely to win.
- Ideal gunman is Chef (or Packie if available). Daryl and Norm will get pinned by a cop car halfway through the escape. Gustovo will do as good as Chef but for more cut. Packie will also do as good for the same cut.
Objectives
- Leisurely Drive - Drive to the bank within 03:30.
- Winner - Win the race back to the meth lab.
Military Hardware
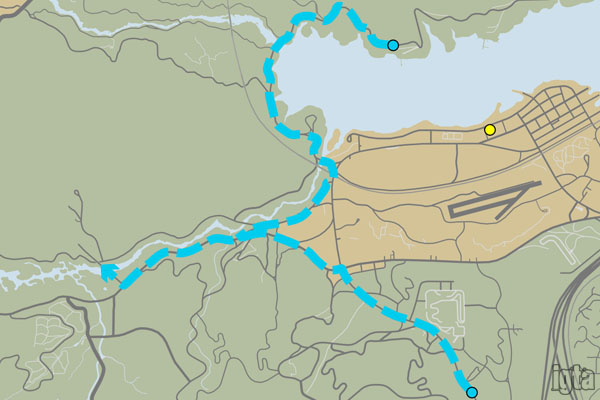
Intercept a military convoy driving through Blaine County towards Fort Zancudo. It can spawn in either location marked below. The convoy consists of a Barracks truck transporting the
military cargo with a single driver escorted by two Crusaders with four
guards each. Sticky bombs placed on the road ahead of them are a good choice for taking out the first Crusader. Find a place nearby with cover (use your vehicle if needed) and blow it up when the Crusader drives over it. Be careful not to blow up the Barracks. Take out the remaining five guards and bring the truck back to the
meth lab. When it is safe and sound behind the gas station Lester is called to say it's there.
Tips
- There is no time objective so take your time with this.
- This mission is open to all kinds of ideas. Obviously sticky bombs are needed initially for the objective.
- The soldiers are well armed and armored so be ready for a fight. If you blow up one of the Crusaders you'll only have five chances left for headshots. Using a sniper from behind distant cover is an ideal method.
Objectives
- Head Hunter - Kill 5 enemies with a headshot.
- Sticky Strategist - Stop the convoy using a sticky bomb trap.
The Paleto Score
After completing the mission
Predator Lester will call all parties involved and let them know the heist is ready. Everyone meets at the meth lab. Michael and Trevor are shown arguing room to room. Franklin breaks them up and Lester goes over the plan with him. With no further questions the crew heads out. As Michael, get in the
van and drive to the
pier in Paleto Bay. Trevor gets some background on each crew member's first bank score. Franklin doesn't really remember but knows he was with Lamar. Michael hit up a small franchise outside Carcer City for $10,000. Story time gets back to Franklin who still doesn't want to talk about it. Trevor questions how trustworthy Franklin is but Michael gets Trevor to share his own story. Trevor robbed a check cashing place where the clerk knew who he was and did a few months in prison because of that. Franklin finally shares his $2000 score story. The dye pack went off so the small take was completely useless.
Drop off Franklin at the marker so he can get in position with the getaway boat. Next go to the
bank entrance. When you get to the marker the crew jumps out. Go
inside the bank. The robbery gets in motion with Trevor doing crowd control and eventually you are given the option to SWITCH to Trevor. Stick with Michael since you'll need to walk over to the
vault to kick in the door after the third crew member works his magic. Trevor goes to the front door and greets some very surprised officers. They immediately call for backup - and lots of it.
As Trevor, go to the
vault where the other two are. You'll now have a 5 star wanted level. More officers arrive on the scene. With all the loot taken the three crew members exit the bank in their bomb squad-style armor with Trevor wielding a minigun. Cue poop in police officer pants.
F**king shit up
Back in control of Trevor, start firing at the
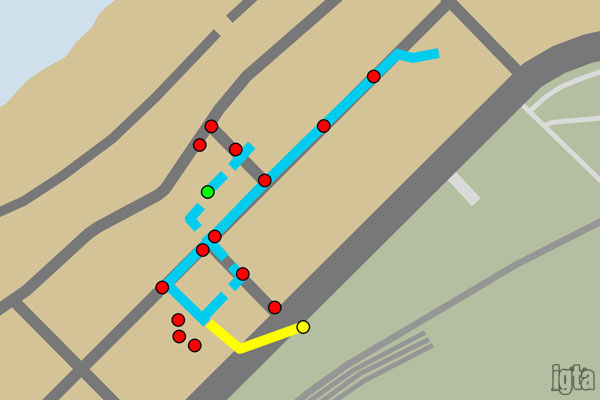
cops and their cars. You have a ton of ammo so don't worry about that. If you prefer a rifle you can SWITCH to Michael. After destroying most of the cars a helicopter swoops in. Take it down and follow the rest of the crew across the street and through an apartment complex. The suit and gun make for a slow getaway. Clear however many
cops you can. Franklin tells the crew that cops are out on the water too so that escape plan won't work. On the far side of the apartments is a
fence that needs to be taken down. Shoot it down as more cops try to get at you.
Continue following the crew behind some houses and back towards the mountain. Michael says their original escape plan is a no-go so they need an alternative. Franklin needs to find a vehicle capable of taking the gun fire. Continue taking out
cops. The crew finds a cruiser to take cover behind if needed. SWAT team trucks are now in the mix. Make your way down the street clearing out all the
cops as you go. Halfway through a military chopper flies in. Trevor comments all of this is to get one of those. Kill the
military and keep moving until a cutscene shows the crew take refuge down an alley. In the next lot you need to contend with the
military. Hold them off. When most of the military are dead another helicopter is spotted but this time it's bringing in a tank. Bad news. Continue taking down military. If you hired a more expensive gunman, they will decide to stay back while the others escape with Franklin. This will help lower the amount of attention for all of them.
SWITCH to Franklin who got his hands on a Dozer. Drive over to
Michael and Trevor. You'll need to navigate through quite a few military vehicles on the way. Pull into the lot and over to the crew. Michael and Trevor get into the Dozer's front bucket and Franklin starts to drive off as a tank pulls in from behind. Back in control, drive out to the
factory. Another tank comes from the right and a third from the far left. Make a beeline for the factory marker to dodge the main gun fire. When you get in front of the factory garage a cutscene shows the crew enter the factory.
Gimme Shelter
SWITCHed to Michael, make your way through the building towards the
railway platform. You can SWITCH between all three protagonists. More
military will greet you along the way so take them out as you move. Franklin hangs back since he doesn't have heavy armor. If you hired a more expensive gunman he will check on the other's progress and says he will attempt to stop more military from entering the building. Get to the final loading dock area next to the tracks and fend off the remaining
military. They come from the back along the aisles and also from the doorway on the right where you came from. Eventually a
train comes so go to it. The trio hops on and rides to freedom.
Later on they wake up with the train stopped in Sandy Shores. Agent Sanchez finds them and gets to hear their opinions of his boss, Steve Haines, who will be in touch soon. After giving the crew their cut Sanchez drives away with the loot. The three decide to split up. Trevor and Franklin hop into a Utility Truck leaving you in control of Michael.
Tips
- There is no vehicle damage objective so you can bang up the van and Dozer.
- Trevor is good for shooting vehicles which will make them explode and take out multiple cops/military at once.
- Aim for the helicopter pilots to take them down faster although it is much more difficult in this mission.
- If you lose a crew member be sure to grab their bag of money.
- While waiting for Franklin the military personnel will take cover behind various things so either slow down your fire rate as Trevor or SWITCH to Michael and pop them off a little easier.
- When driving the dozer don't worry about the military soldiers. Drive right past them. In a similar manner do not try to avoid the tank fire. Just drive straight out the gate and straight to the garage. Zigzagging actually seems to attract a hit.
- Michael is also an ideal choice when navigating the factory.
- Use grenades if you have them to clear out groups from a distance.
- Stand on the train platform near the tracks so the cutscene will trigger as soon as possible.
Objectives
- Let it Rain - Fire over 4000 bullets.
- Accuracy - Finish with a shooting accuracy of at least 50%.
- Mission Time - Complete the mission within 16:00.
- Collateral Damage - Cause $1,000,000 damage in Paleto Bay.
 © iGrandTheftAuto & Simon 'Psy' Elliott 2008-2024. Powered by iGrandTheftAuto CMS. Privacy Policy

