
The Big Score & Set Up
Published by TreeFitty
Last Updated
The time has come for the old crew and their new acquaintances to capture a dream. Over $200 million in gold is waiting. This is the big one.
The Big Score & Set Up
| ● GOLD MEDAL ● Various Objectives See Below |
Protagonists: Michael, Trevor, Franklin
Decisions, Decisions
After completing Michael's mission Meltdown, Trevor meets Lester backstage at the Vanilla Unicorn strip club. They go into the office and discuss the job ahead - mainly if Michael will keep his mouth shut this time. Lester thinks he will. Franklin and then Michael enter the office. Trevor and Michael start to go at it but Lester intervenes. He shows the crew his planning board. There are two options: Subtle and Obvious. The first method is to take over the armored cars transporting the gold. They'll use other vehicles to transport the gold away. The transportation grid will need to be manipulated to their advantage. The second method is to cause a distraction out in front of the Union Depository (deemed Michael's duty). Another team will drill into the vault and take the gold from there.The second option requires a large drill which will need to be stolen and parked nearby. They'll enter through the new subway tunnel. Two helicopters will be needed to get the gold out of the hole. A getaway vehicle will also be needed and parked in a nearby parking garage. Lastly they'll need to steal a train to land the gold on and take the score to a warehouse. Back to the first option, spike strips - named "Stingers" - will need to be acquired from the police. Getaway cars will be needed with suspension modifications since 4 tons of gold is very heavy. The underpass spotted previously will serve as a "smoke and mirrors" point. Make your choice. Subtle will require two gunmen (1. assist inside bank & move gold to cars, 2. take away armored car hostages), two drivers (1. gauntlet driver & bank helper, 2. armored car tire changer), and a hacker (traffic control). Obvious will only need two drivers (1. second helicopter, 2. train) and two gunmen (1. help Franklin get gold, 2. distraction with Michael).
- Hacker: Rickie Lukens (4%), Christian Feltz (10%), Paige Harris (15%)
- Gunman: Daryl Johns (6%), Norm Richards (7%), Hugh Welsh (7%), Karl Abolaji (8%), Chef (12%), Gustavo Mota (14%), *** Packie McReary (12%) If rescued during random event
- Driver: Karim Denz (8%), Eddie Toh (14%), *** Taliana Martinez (5%) If rescued during random event
Pick your approach plus the crew and confirm the choices. With the decision made the crew heads out. Lester will get to work locating necessary equipment. You are left in control of Michael.
Tips
- The order in which you hire crew members for each position matters. The first and second person of a position have specific duties during the heist.
- Optimal crew for subtle is Chef (or Packie) and Daryl, Eddie (or Taliana) and Karim, Rickie. Like the other jobs Rickie won't be the fastest for helping you but the job can still get done without issue. A less experienced gunman in the first spot will not transfer all of the gold to the cars. A less experienced driver in the first spot will get caught by police during the chase.
- Optimal crew for obvious is Eddie (or Taliana) and Karim, Daryl or Hugh or Norm for the gunman spots. A less experienced driver in the first spot will crash the helicopter in the wind farm. The gunman position has no direct consequence so you can use two less experienced gunmen. You may want someone better at shooting in the second spot, though.
- If you used less experienced people on previous jobs they will have gained experienced and can be used for the more important spots.
Objectives
- None
Subtle
The decision is made to hijack the armored cars.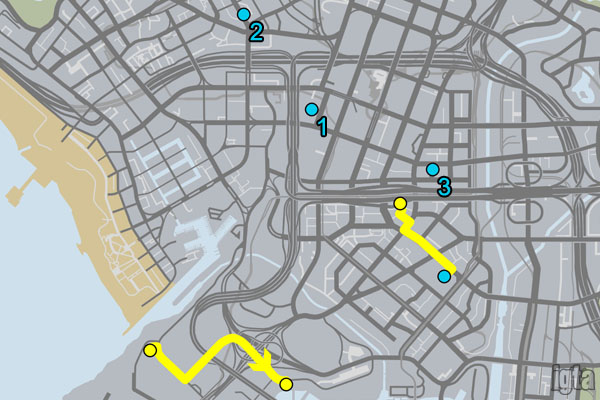
Stingers
Shortly after leaving the strip club Lester sends out a message saying that a police van with spike strips is at the police precinct in South Los Santos. He also has a hacker working on finding Gauntlet Muscle cars. Expect an email soon. Go to the precinct and steal the police van. There is a wall with a gate around the lot so you'll need to climb over it or use a police vehicle to open the gate. A smaller gate is located around the west side but two cops will try to stop you. Best option is to go to the south side and climb over the smaller wall above the lot. However you do it, get to the van. An LSPD officer is on the other side of a small building talking on the phone about the movie Meltdown. Try to avoid alerting him. Steal the van and lose any attention you attract. When the heat is lost take the van to the hiding place. Lester is called to confirm the delivery.Tips
- Best option is to drop into the lot from the south side. You can get in the van and drive off without alerting the police as long as you don't make any loud noises. You should be able to deliver the van within 45 seconds.
Objectives
- Escapee - Steal the Police Transporter and escape within 02:00.
- Not a Scratch - Deliver the Police Transporter with no damage.
Gauntlets
Lester will send an email containing car locations. He got one to test it out so they only need three more. If you hired a less experienced hacker then you'll be given pictures from CCTV cameras showing distant images of cars circled. You'll need to figure out where the pictures were taken and scout out the cars. A better hacker will have more detailed location descriptions including maps and better pictures. The locations are:- 1. Pillbox Hill (Downtown), top floor of parking garage 2 blocks west of Maze Bank Tower.
- 2. Rockford Hills, Portola Drive near Vangelico (from the jewel heist).
- 3. Mission Row (Downtown), Fantastic Place at the base of southern Templar Hotel building.
When you find a car take it to Los Santos Customs down at the airport. Pull inside the garage and repair the vehicle if needed. Next select Gold Preparation > Heist Prep for $11,000. Make any other changes you wish (check out the "extras" for some useful items) and exit. Now take the vehicle to the lock up not too far away. Park the car inside and exit. Lester is called to confirm the delivery for each one.
Tips
- This mission is straight forward. Find and deliver the cars. You can steal other Gauntlets off the street but will not make the Mapped objective.
- To make the Not a Scratch objective you can't bang up the cars too much even before going to LS Customs. Minor repairs ($100) will pass but nothing worse.
Objectives
- Mapped - Deliver the Gauntlet pictured in the email.
- Not a Scratch - Deliver the Gauntlet with no damage (up to $100 in repairs at LS Customs).
- Pimped Out - Spend $17000 modifying the Gauntlet.
The Big Score
After all the necessary vehicles are acquired Lester says to meet at the strip club. Inside the Vanilla Unicorn Lester is busy admiring the staff in the dressing room area. Trevor says the show is for paying customers only. Lester hands him a box and tells him to get changed. Michael enters and is handed a box too. Franklin walks in and is taken into the office by Lester. The hacker comes in the back door to get set up. Michael and Trevor - now wearing armored car uniforms - go outside and meet with a hired driver and gunman. As Michael, get in the car and drive to the tunnel entrance before 8:00 AM. Trevor questions if Michael is setting them all up. Michael brushes off the small talk. This is the big one. They need to be focused on the goal.When you arrive at the location early Michael comments that they need to wait. Trevor continues to rant about things going wrong. Eventually the vans show up so it's time to kick off the heist. Back in control, you are told to drop the stinger in the tunnel. Do so and start to drive away. The vans hit the spikes and spin out. Get out of your car and move over to them. The team helps the employees exit the vans and rounds them up. The other two hired crewmates now pull up. They roll out new truck tires and get to work replacing the flats. The security crew is cuffed. The team has one minute to get this done before the stagnant GPS alerts someone. One of the guards named Casey tells them they can have whatever they need. They tell him he's coming with them. The rest of the guards are moved into the other vehicle. Casey is put up front of Michael's van. The tire team completes their work and move out with the vehicles and guards.
Back in control of Michael, drive the armored car to the depository. Casey is quite fearful but Michael tries to calm him down saying they are about to rob the biggest bank on the planet. Pull up to the garage door. A cutscene shows pretty much the same late comment from the guard standing by. Casey shows his ID and the vans are allowed into the building. Onion & Eggplant are parked at the loading dock and a manager in a suit checks IDs. He stares at
Follow them into the back where the gold bars are being kept. The manager says they are being kept for China and jokes with Trevor to take what he can carry. They all laugh. Trevor and Casey each push a cart of gold bars. Follow them back through the building to the loading dock. Trevor comments that it's a lot of metal. The manager says it's an irregular amount but that's what the computer said to ship out. After the gold is loaded Casey claims he isn't feeling well to the manager but Michael and Trevor tell him to suck it up while pulling him away.
Metal to the pedal
With the gold loaded up, get back into the van with your crew and follow Trevor out. Back on the streets Michael calls into "control". Franklin says Merryweather knows they infiltrated the Union Depository and are looking for them. Not good. He also says they'll play with the traffic lights to keep them separated. You are told to SWITCH to Franklin. Do so and he is with Lester and the hacker under the freeway with the Gauntlets. They set up a link to the traffic lights and a minigame is started. Traffic lights and their current status are shown in the downtown area. The vans are marked with blue arrows top left and the destination is shown bottom right. Move the highlighted area around to different traffic lights and click to change which direction has the green. If you hired a less experienced hacker there will be small a delay. Get the vans moving. Eventually Merryweather shows up as a red arrow off to the right. Keep the vans moving away from Merryweather which spawns elsewhere. They'll stop at red lights so try to change ones in their path to red. Of course the lights keep changing so you'll need to keep an eye on all parties. In an effort to avoid Merryweather, the vans end up taking a path leading towards the first one. You'll need to move the first enemy through ahead of the vans or else they'll be seen. Stop other Merryweather units from getting near until the vans pass through the destination.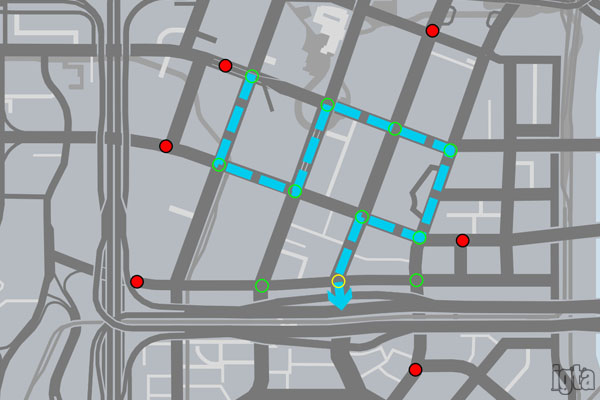
After getting the vans away successfully, they pull up to Franklin and the rest of the crew. The trucks are unloaded into the cars. Trevor grabs Casey and pretty much says he's going to die. Michael decides to give Casey a gold bar and tell the press something other than what happened. Casey runs off saying he was jumped and never saw a thing. Trevor rants about Michael being soft but Franklin breaks them up. Suddenly two Merryweather vehicles roll up. The crew splits off with the protagonists fending them off while the others continue to unload the gold. You can now SWITCH between all three protagonists.
Start killing the Merryweather guards. More vehicles continue to pull up from the south and then the east. Keep an eye on all three characters since they can get overrun. Explosives can be very useful to clear many enemies at once. Eventually two snipers appear to the south up on the freeway entrance ramp. Kill every single one. When they are all dead the crew finishes unloading the gold. If you hired a less experienced driver not all of the gold will be transferred. All three protagonists get into a Gauntlet with the hired driver taking the fourth. They drive off with Michael taking the lead.
Follow the crew as you are given a 5 star wanted level. Michael will give directions prior to turns. Needless to say there will be cops all over you. Keep up with them through the action-packed streets. After going through the large mall a fuel truck is on the other side and gets hit by a cop car causing a large explosion. If you have a less experienced driver, not long after the fuel truck they will crash and be left behind along with their portion of the gold. When you get onto the freeway you'll enter the tunnel under Del Perro to avoid an LSPD helicopter. Two trucks with ramps are ahead in the tunnel. The cars pull up inside and you need to go into the truck on the right. The LSPD helicopter is waiting on the other side but since they don't see the cars exit the tunnel it is assumed they are still under there. The trucks drive off as the screen goes black.
Later the protagonists are shown out in Blaine County. The big rigs drive off with the gold. Michael says Lester is meeting them at his place. The three get into an SUV. As Franklin, drive to Michael's house. Trevor comments how they are just leaving the gold but Michael tries to talk sense into him. Franklin joins in saying how they both should stop moaning. At the house Lester meets them out front. He says the gold is locked up and it will be a few days before the metal starts moving again. Trevor continues to knock Michael about betraying the crew. Lester breaks them up but pokes fun at the West Coast which gets Franklin a little upset. All four end up going at each other aside from Michael and Lester who are still good. Franklin walks off and the screen goes black. Later you are put back in control of Franklin who is cruising around Los Santos.
Tips
- The first half of the mission is straight forward. Follow the instructions to get the armored cars and wait out the boring walk through the bank vault
- The traffic light minigame shouldn't be too much of an issue. Get your guys moving and stop the enemy on the bottom right. Stop the next enemy from the top left and when your guys start heading back up the streets let the first enemy go through. Stop another enemy from the middle left so they don't head towards the same intersection as your guys. You may need to stop the final enemy vehicle bottom right from going through. You can complete the Signal Man objective with 8 changes.
- When it comes time to face Merryweather explosives (RPG especially) are extremely useful. It is easy for a character to get overwhelmed by the amount of fire power getting throw at you. There is cover everywhere under the freeway which is good for both sides.
- The final chase shouldn't be too much of an issue. Just follow the others and try not to stop (crash) or slow down too much. Remember to use Franklin's special ability when needed for the sharper turns.
Objectives
- Headshots - Kill 20 enemies with a headshot.
- Signal Man - Perform less than 10 traffic light changes.
- Accuracy - Finish with a shooting accuracy of at least 60%.
Obvious
The decision is made to drill into the vault.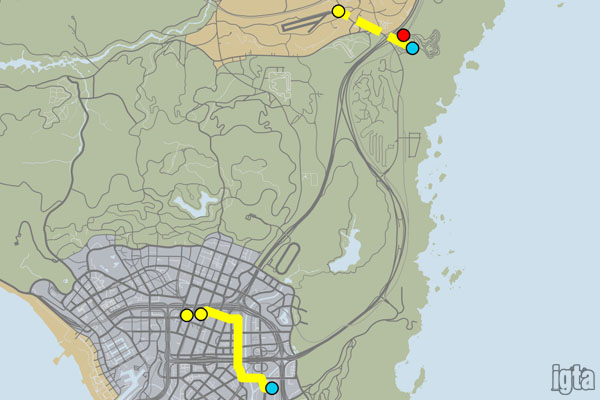
Driller
Not long after leaving Vanilla Unicorn Lester sends out a message about a tunnel boring machine location. Go to the depot in East LS. Get in the yard and steal the truck carrying the driller. There are workers and security guards around the depot. If you alert them you'll be given a 2 star wanted level. Try to take them all out with stealth or silenced weapons. Lose any attention however you can. When you are in the clear Lester is called. He says there is a guy working the parking lot behind the Union Depository who will let you in. Go to the parking lot and park in the marker next to the barriers. Exit the truck to complete this mission. Lester is called again to confirm the delivery. He says they still have plenty of work ahead.Tips
- If you don't care about the police attention just drive in, equip a gun to scare off the workers, and quickly steal the truck before security gets you.
- Since the truck is very slow, a train tunnel is a good option to lose the cops. In the rail yard along the river in Downtown LS is an entrance to one (with some tight squeezes). You may need to finish off one or two cops chasing you but after that they will lose sight of you.
- To complete this mission without alerting anyone, you need to snipe all the workers and two security guards in an almost-exact order to avoid one person seeing his coworker's head explode. Stand on the west side of the depot. First take out the security guard near you. A worker is behind him with a clipboard but let him walk to the other side of the lot. Look towards the left for another worker on the north side. Snipe him and then try to find the worker under the roof structure (he may be hidden by the dirt pile). Kill him and then find the worker on the right (south side) near you. Kill him and then kill the first worker with the clipboard who is now in front of the truck. Next you need to perform a double kill. Also on the south side more towards the middle are two workers talking. Get as far south as you can and wait for their heads to line up and take the shot. If you miss one quickly kill the other. Now just kill the second security guard at the far side of the lot. Everyone is dead so move in and grab the truck. If you have trouble with the double kill go to the east side entrance. You can also stand on top of dumpsters along the south side without entering the property to take out many of the workers.
Objectives
- Sneak Thief - Steal the Cutter without being detected.
- Mission Time - Complete the mission within 05:00.
Sidetracked
Lester sends out another message about the train. They need an engine and flatbed car. He's sourced a sky crane to pick them up. All you need to do is divert a train at Davis Quartz and call another person to fly in with the helicopter. Deal with any workers as you see fit. Head out to the railroad switch house next to the quarry in southeastern Blaine County. Your character will call another to give a heads-up about bringing in the chopper from Trevor's airfield. Two railway workers are around the building. One is outside on the ground and the other is up in the control tower. Take them out before either has a chance to call the cops. Use stealth or a sniper. The other protagonist is called and says they are almost at the airfield. Go up into the tower to the signal box. When you get up to the box flip the switch. Now wait for a train to arrive and get moved into the siding. The other protagonist is updated. Shortly after a train comes along and is diverted as expected - silly trains stuck to tracks!Once that happens your character updates the other who is in the chopper. You are told to SWITCH to them. Do so. In the Skylift, fly over to the train and pick up the freight engine. The first protagonist says he'll get to know the engineer. Line up the chopper over the engine and activate the electromagnet when told to. With the engine picked up fly it back to Trevor's airstrip. Back at the strip you are instructed to lower the engine onto the trailer. Do so and deactivate the magnet when told to. Now go back to the train and get a flatbed carriage and bring it back to the airstrip where another trailer will be waiting. There are a few flatbeds to choose from in the train. After successfully dropping the flatbed the mission is complete.
Tips
- A sniper is usually easiest from your starting point. If you use stealth make sure you are always behind the first worker so he can't see you coming.
- The helicopter does not need to be perfectly aligned when picking up or dropping the rail vehicles. Get close enough and the game will tell you when to hit the magnet.
Objectives
- Mission Time - Complete the mission within 04:30.
- Undetected - Steal the train without being detected.
Getaway Vehicle
Find a good 4 door getaway vehicle. Take it to LS Customs and buy some upgrades if you wish. When you are ready call Lester > Getaway vehicle ready to let him know you have it. Park it in the Arcadius underground parking lot across the street from the depository. Stop in the marker and exit the vehicle. Lester is then called again to confirm the placement.Tips
- Choice of vehicle and upgrades is up to you. You'll probably want some of the upgrades due to the police presence when the getaway vehicle is needed.
Objectives
- None
The Big Score
Inside the Vanilla Unicorn Lester is busy admiring the staff in the dressing room area. Trevor walks in and Lester hands him a box and tells him to get changed. Michael and then Franklin enter and are handed boxes too. When they are all dressed they meet in the office before heading out. In control of Michael, get in his car and drive to the bank. During the ride Trevor questions why Lester is in the helicopter with him. Michael says Lester is handling logistics. Franklin will confirm he is in position inside the tunnel. Pull into the marker and meet up with one of the hired gunmen who is the other half of the distraction team.You are now SWITCHed to Franklin operating the Cutter down in the tunnel while Michael kicks off the distraction robbery. The second hired gunman is nearby giving Franklin directions. Controls for the machine are displayed. Move it over to the wall and start cutting through. A cutscene shows the destruction unfold inside the vault. Alarms begin to ring. When the cutting is complete reverse the machine out and park it by the opposite wall out of the way. Lester comments that the main vault door is locked down due to the vibrations and a security team may come in the tunnel behind you. Short on time, run back inside the vault and place explosives on the gold vault doors. Step back and blow the charges.
Fend off the NOOSE team while the gunman starts moving the gold carts. Two teams of four come from the south followed by two more teams from the north. Take them all out. There's a health pack opposite the vault on a blue structure. You'll need to climb down some stairs to get to it. As the gunman loads up the last cart into a cage Franklin informs Trevor they are ready for the chopper. Trevor will be there in a second. A cutscene shows the choppers hover over the hole. The tunnel team attaches hooks to the cages but another NOOSE team makes their way through the vault. Start clearing the vault. There are two teams of four. Trevor says more are rappelling down into the hole. Kill the final team. When they are dead Trevor says he'll bring the chopper back around but Franklin and Lester tell him to just go. SWITCH to Trevor. In control of the helicopter fly out of the city with the gold following the other hired driver. With cops all over Downtown LS, the distraction team and tunnel team decide to meet up on the foot bridge between the depository and Arcadius where the getaway vehicle is located. The gunman with Franklin decides to cut out now instead. SWITCH to Michael.
Blood bath
Michael and his gunman are busy fighting off a 5 star wanted level. Start clearing the area of cops while making your way to the footbridge ahead. When you get towards the bridge an LSPD helicopter flies by and drops off more cops across the street. Go down the stairs and meet up with the tunnel team. Franklin is glad to see them. Start clearing the bridge of NOOSE officers. Franklin wants to move across. You can now SWITCH between Michael and Franklin. Move down to the bridge and another LSPD helicopter flies by. Keep moving west while clearing the area of cops. On the other side of the bridge on the right is health pack if needed. When you get to the south side of Arcadius yet another LSPD helicopter flies by. Lester informs the crew that Merryweather is on the way. Michael says the locals are doing just fine right now.
There are too many cops on the ground so Franklin says to stay elevated. Head up the next set of stairs with the others. Even more NOOSE officers are waiting around the elevated plaza. Wipe them out and another LSPD helicopter flies over to drop off more. Move forward towards the building as more NOOSE officers appear. Kill them all and get to the north side. You are now met by a Merryweather Buzzard. Take it down. Move down the stairs with the others. Franklin speaks with Trevor who is waiting for the train with no Merryweather in sight. Continue to wipe out NOOSE officers while following the others. When you get to the west side kill the cops on the roadway below while making your way over to the downward ramp. More cops roll up as you reach the street. Kill them and get into the parking garage. Inside the garage NOOSE officers drive in from the opposite side. There will be three teams of four driving in one at a time. Wipe them out and get into the getaway car.
You now need to lose the cops - all 5 stars worth. Break their line of sight however you can and stay out of it until the heat is lost. Train tunnels are awesome for this. When they are clear Michael calls Trevor who has Merryweather coming at him. SWITCH to Trevor who is still following the other chopper. Three Merryweather Buzzards appear. Two are ahead and one is off to the right. Lester tries his hand at firing an RPG since Trevor is busy flying. To help him out, fly close to the Buzzards and keep as steady as possible. They'll go after the other helicopter so chase after them. They end up flying through the wind farm which can be very hazardous to helicopters. If you hired a less experienced driver they'll end up crashing into one which loses half the gold. That doesn't mean Merryweather can't take down an experienced driver. Take down all three enemy choppers quickly before they take out the other chopper or get too close to the train. When all three enemy choppers are destroyed you are told to drop the gold onto the train car. The train - operated by the second hired driver - is moving along the tracks making a small challenge. Let the other chopper drop their gold first and then move in. Lower down over the train and drop the cargo when told to.
With the gold on its way land back at the airfield north of the Alamo Sea. Lester says Merryweather isn't sending anyone else. He definitely had a... blast using the RPG. When you land the rest of the crew arrives. Trevor tells Michael they are good but Michael takes it as a celebration buzzkill. Franklin takes off and Lester tells Michael and Trevor he needs help moving the gold into storage before he can sell it in a few days. Michael tells the hired guys not to spend any big bucks right away. They all split up as the screen goes black. Later you are put back in control of Franklin who is cruising around Los Santos.
Tips
- Drilling in and blowing the doors shouldn't be an issue.
- When facing NOOSE in the tunnel use cover which is plentiful. You can use the cutting machine as cover too. Aim for headshots and try not to let the NOOSE officers get too close. Kill them as quickly as possible.
- In the bloody run to the getaway vehicle continue to use a mix of cover to take out a few enemies and then run-and-gun when a few are left. Don't worry about the cops on the ground until you get on the west side. Focus on the NOOSE officers marked in red on your radar. You don't need to get the rest.
- Explosives are very useful inside the parking garage. RPG or sticky bombs work best to take out the NOOSE vehicles right as they get to the middle but be careful not to throw sticky bombs (or grenades) too high or else they can stick to the ceiling (or bounce back at you).
- Easiest way to get away from the cops is to drive into a train tunnel. There is an entrance east of Downtown LS along the river and another next to the Mile High Club construction site. Once you are inside you may need to dodge a couple pursuing police vehicles but after that you should be fine. Just wait out the attention.
- In the helicopter you really need to keep it as steady as possible when Lester fires. Smooth turns are okay but any wild swinging will cause Lester to miss. You don't need to be close to the enemy choppers but keep them off to the right as much as possible. Being under or above does not matter.
- As soon as the last enemy chopper is gone head towards the train tracks. Just like stealing the train, you don't need to be perfectly aligned when dropping the load. Watch out for obstacles and get low over the train car. Release the cargo as soon as the game says to do so.
Objectives
- Headshots - Kill 20 enemies with a headshot.
- Mission Time - Complete the mission within 16:00.
- Cha-Ching - Drop the gold onto the train within 30 seconds.
- Accuracy - Finish with a shooting accuracy of at least 60%.
This guide has been viewed 166,860 times. Thanks for your support!